Installing the Plugin and Example Project
Requirements
The current sample project targets Unreal Engine 5.5 and the plugin's native runtime is Win64-only. Building the example project or a C++ game requires Visual Studio 2022 with the Game development with C++ workload. If you use another Unreal Engine version, rebuild and test the plugin for that engine before release.
The CrowdControl-Unreal repository is a complete Unreal project with the plugin under Plugins/UnrealCrowdControl. Its example content includes:
BP_CrowdControlExampleCharacterGM_CrowdControlExampleGamemodeW_Example_Login
Run the Example Project
- Clone or download the
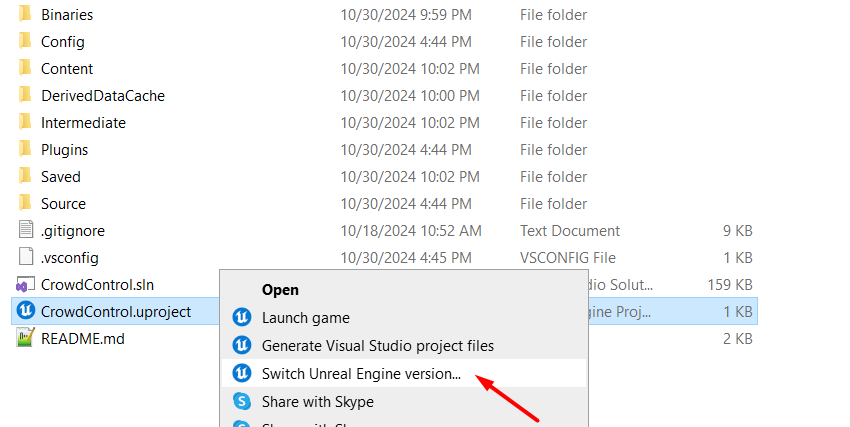
CrowdControl-Unrealrepository. - If Windows offers the command, right-click
CrowdControl.uproject, choose Switch Unreal Engine version, and select your UE 5.x installation. - Right-click the project again and choose Generate Visual Studio project files.
- Open
CrowdControl.uproject. Allow Unreal to build missing modules when prompted. - Open
Content/ThirdPerson/Maps/ThirdPersonMap. - In World Settings, set GameMode Override to
GM_CrowdControlExampleGamemodeif it is not already selected.
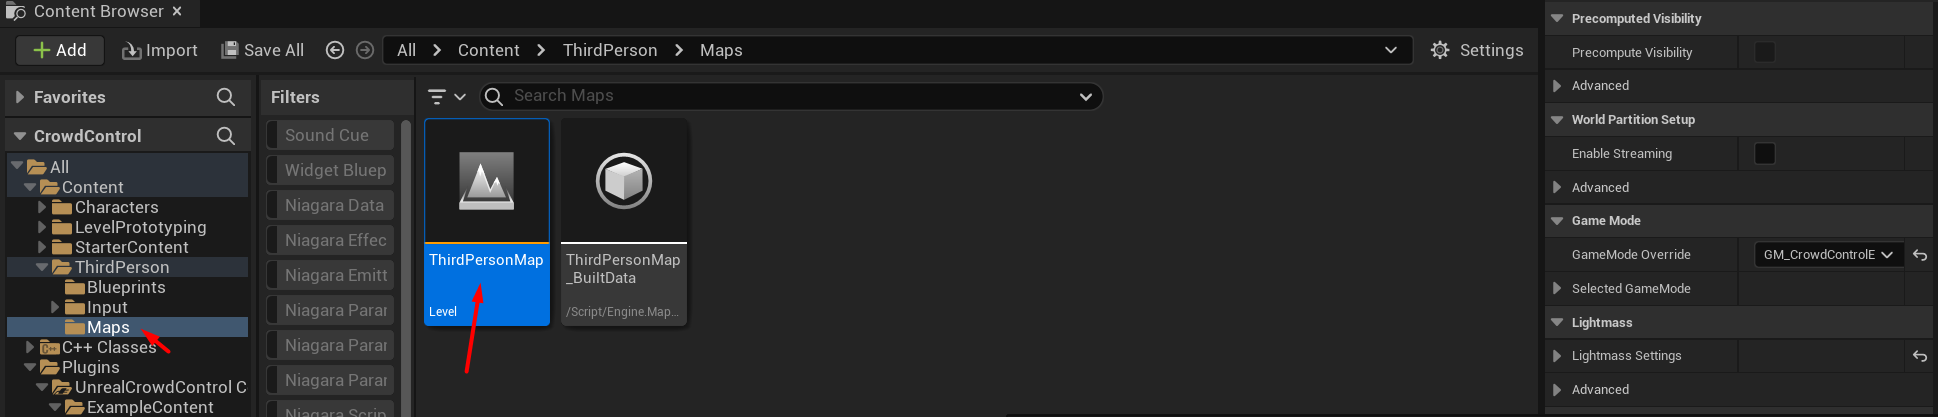
Plugin content is hidden by default. To inspect the examples, enable Show Plugin Content in the Content Browser settings, then open UnrealCrowdControl Content/ExampleContent.
WARNING
The bundled W_Example_Login and BP_CrowdControlExampleCharacter assets still demonstrate the compatibility flow based on OnCommandIDChanged, platform-named login nodes, and delayed registration. Use them to inspect UI and gameplay ideas, but follow this tutorial's OnAuthCodeReceived, OnConnectionStateChanged, and OnSessionReady flow for new integrations.
Add the Plugin to Your Game
- Close the Unreal Editor.
- Copy the complete
Plugins/UnrealCrowdControldirectory into your project'sPluginsdirectory. Keep itsBinaries/Win64files together; the native Crowd Control runtime and its OpenSSL/cpprest dependencies are loaded from that directory. - Regenerate project files if your game has a C++ target.
- Open the project and enable UnrealCrowdControl under Edit > Plugins if it is not already enabled.
- Restart the editor when prompted.
The plugin is currently Win64-only because it loads a native CrowdControl.dll.
Configure Crowd Control
Open Edit > Project Settings > CrowdControlSettings and configure:
| Setting | Purpose |
|---|---|
| Game Pack ID | Identifies the game's effect pack. Use UnrealDemo while evaluating the example. Replace it with the ID assigned to your game before release. |
| Application ID | Identifies your Crowd Control application and enables the authorization-code login flow. Request an ID when you submit your effect pack. |
| Start Session Automatically | Starts a Crowd Control game session after authentication. Leave enabled for the simplest setup; disable it only if your game explicitly calls StartGameSession and StopGameSession. |
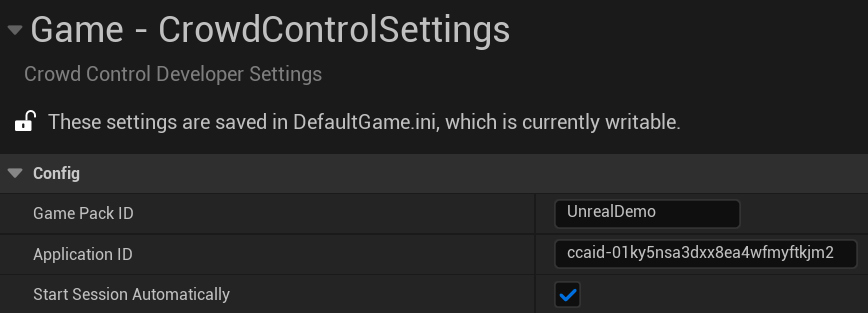
The equivalent DefaultGame.ini section is:
[/Script/UnrealCrowdControl.CrowdControlDeveloperSettings]
GamePackID=UnrealDemo
ApplicationID=your-application-id
bStartSessionAutomatically=True
GameName and PublicClientKey are not settings in the current Unreal plugin. Application authentication uses PKCE and requires only the ApplicationID.
Logging
Add a Crowd Control category under [Core.Log] in Config/DefaultEngine.ini when diagnosing a connection:
[Core.Log]
LogCrowdControl=Verbose
Use Log for normal development and Verbose or VeryVerbose only while troubleshooting. Do not enable verbose logging in a shipping build unless needed.
Next Step
Continue with Connection, Authentication, and Sessions.